The Flavor Science: Balancing Heat, Acid, and Umami
The Raw Ingredient Architecture
How to Make Red Chili Sauce: Step-by-Step Production Guide
Creative Flavor Variations to Customize Your Batch
Common Mistakes: Troubleshooting Your Red Chili Sauce
The Ultimate Pairing Guide: How to Serve Your Masterpiece
Frequently Asked Questions (FAQ)
Official Recipe Card: Classic Scratch-Made Red Chili Sauce
The Search for the Perfect Crimson Heat
Every home cook needs a signature, reliable hot sauce that can sit front and center on the refrigerator shelf. We are talking about a sauce that isn’t just basic, single-note vinegar heat, but a deep, rich, and intensely savory liquid gold that breathes life into any dish it touches. When you look at store-bought choices, they are frequently packed with unnecessary sodium, artificial stabilizers, and gums that dull the pure brilliance of the peppers. Stepping up to master a homemade red chili sauce recipe changes everything, putting you in complete control of your flavor destiny.
Crafting your own spicy condiments from scratch allows you to highlight the authentic personality of the chilies you choose. Whether you want a punchy, sharp tabletop drizzle for morning eggs or a deeply complex base for marinades and stir-fries, this formula serves as your ultimate foundational canvas. Say goodbye to mass-produced, watery condiments and prepare to unleash a wave of fresh, vibrant heat across your entire kitchen repertoire.
What is a Homemade Red Chili Sauce?
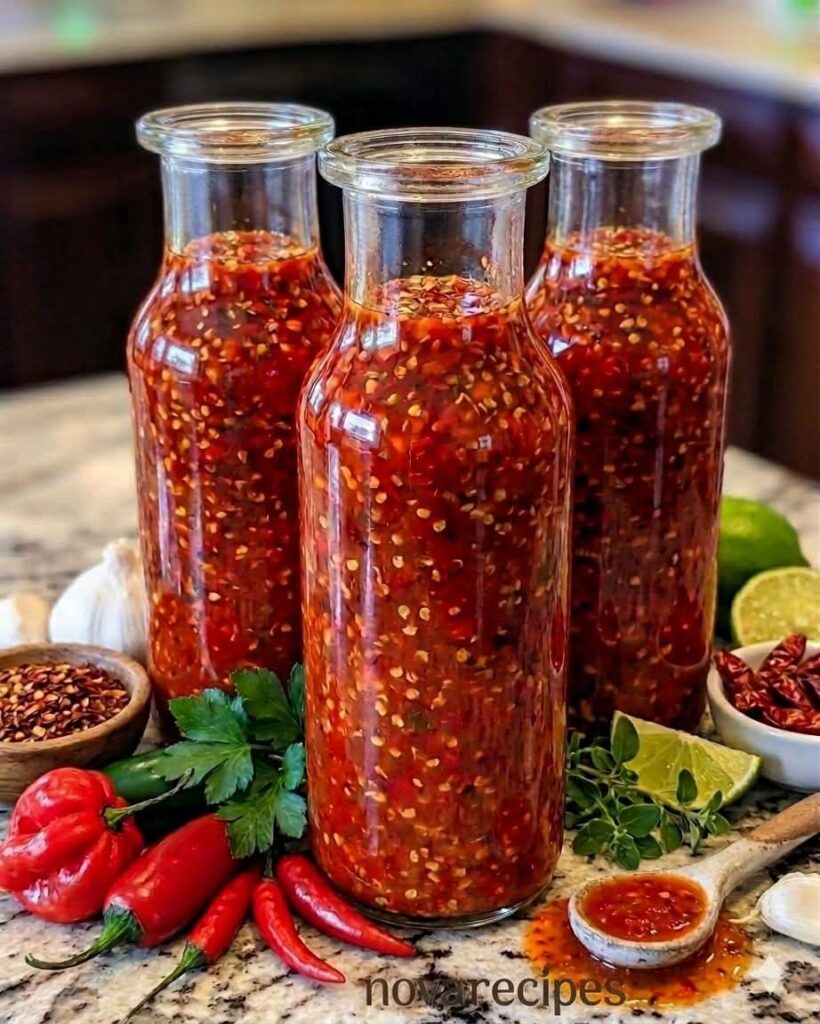
A homemade red chili sauce recipe is a smooth, vibrant, and incredibly versatile condiment constructed from fresh red chili peppers, savory aromatics, and a balanced acid base. Unlike thick, paste-like Asian chili purees or heavy Mexican adobos, this style is designed to be pourable, clean, and perfectly emulsified. It strikes a precise middle ground between a bright table sauce and a functional kitchen cooking asset.
The hallmark of a great scratch-made spicy chili sauce is its striking crimson color and bright flavor. By cooking the ingredients down gently before blending, the natural sugars within the red peppers soften and caramelize, harmonizing beautifully with sharp vinegar and pungent garlic. The result is a rounded, mouth-watering condiment that coats your food smoothly rather than running right off the plate.
The Flavor Science: Balancing Heat, Acid, and Umami
A common trap when learning how to make red chili sauce is focusing exclusively on making it as spicy as humanly possible. True flavor experts know that raw heat without structure quickly numbs the palate and leaves food tasting incredibly flat. This homemade red chili sauce recipe builds a multi-dimensional sensory experience by carefully balancing three core pillars: capsaicin, acetic acid, and glutamic acid.
Capsaicin provides the fire, stimulating the pain and heat receptors in your mouth. To transform that sharp burn into a pleasing, crave-worthy warmth, we introduce vinegar (acetic acid). The acid acts as a natural flavor magnifier, cutting through the heavy elements of the pepper oils and stimulating your salivary glands.
Finally, the garlic, onions, and salt supply natural glutamates (umami). This provides a deeply savory anchor that keeps the heat from tasting thin or strictly medicinal, resulting in a full-bodied sauce that stays complex from the first taste to the lingering finish.
The Raw Ingredient Architecture
Choosing high-quality, fresh ingredients ensures your sauce turns out beautifully bright and perfectly textured. Here is exactly what you will need for this blueprint:
The Chili Base
Fresh Red Chili Peppers: For a well-rounded, classic table heat, use a blend of red jalapeños, Fresno chilies, or red serranos. Look for smooth, shiny skin without soft spots or wrinkles. Fresno chilies offer an excellent, slightly fruity note that grounds the sauce beautifully.
The Savory Anchors
Sweet Yellow Onion: Provides a gentle sweetness as it cooks down, keeping the vinegar base from tasting overly harsh.
Fresh Garlic Cloves: Do not skimp here. Garlic provides the key savory undertones that elevate this from a simple pepper mash to a gourmet condiment.
Brown Sugar: A small touch of brown sugar balances the sharp acidity of the vinegar and enhances the natural sweetness of the red peppers.
The Preserving Liquid Base
Distilled White Vinegar or Apple Cider Vinegar: White vinegar keeps the color of the sauce clean and bright, while apple cider vinegar adds a subtle, fruity complexity.
Filtered Water: Used to dilute the acidity slightly, ensuring the mixture can simmer down smoothly without reducing into a thick paste.
Coarse Sea Salt: Acts as a vital flavor enhancer and an essential natural preservative.
How to Make Red Chili Sauce: Step-by-Step Production Guide
Phase 1: Knife Work and Safety Protocols
Because chili oils can cling to your skin for hours, always wear kitchen gloves when prepping fresh peppers. Slice off the green stems and roughly chop the chilies. If you prefer a highly approachable table sauce with a clean burn, split the peppers open and scrape out the seeds and white ribs. If you live for intense heat, leave the ribs and seeds completely intact. Roughly dice your sweet onion and peel your fresh garlic cloves.
Phase 2: Sweat and Soften the Aromatics
Warm a small teaspoon of neutral cooking oil in a medium saucepan over medium-low heat. Toss in your diced onions and whole garlic cloves. Sauté them gently for about 4 to 5 minutes, stirring occasionally until they turn soft and aromatic. Keep a close eye on the heat; you want to avoid browning or burning the garlic, which would introduce an unwanted, bitter taste to your final crimson sauce.
Phase 3: The Simmer and Infusion Process
Pour your chopped red chilies, brown sugar, and coarse sea salt into the saucepan with the softened aromatics. Pour in the vinegar and filtered water. Give everything a thorough stir and bring the liquid up to a gentle boil. As soon as it bubbles, drop the heat down to low, pop a lid on the pan, and let it simmer for 15 minutes. This slow cook infuses the liquids and softens the skin of the peppers, laying the foundation for a flawless blend.
Phase 4: Blending to Perfect Emulsification
Remove the pan from the stove and let it sit for a few minutes to cool down slightly. Pour the warm contents carefully into a high-powered blender. Secure the blender lid tightly, holding it down securely with a thick kitchen towel. Start processing on low speed, then gradually crank it up to maximum power. Let it blend continuously for a full 60 to 90 seconds. You are aiming for a silky, smooth, uniform texture without any large visible bits of skin.
Creative Flavor Variations to Customize Your Batch
Once you feel confident with this classic formula, you can easily adapt it to match a wide range of flavor profiles.
The Tropical Fruit Variant: If you want a sweet, vibrant profile, blend in a cup of fresh fruit. To see exactly how to execute this style flawlessly, read my deep dive on the Pineapple Hot Sauce Recipe or explore the incredibly popular Mango Habanero Sauce Recipe.
The Green Heat Alternative: If you want to compare red chili heat against its green counterpart, or simply prefer a brighter, more herbaceous punch, experiment with my classic Green Jalapeno Hot Sauce Easy Homemade Recipe.
The Fermented Depth Edition: For an incredible, deep complexity that mimics artisan fermented products, you can check out how aging peppers transforms raw heat into liquid gold in my guide for Fermented Habanero Hot Sauce.
The Asian-Inspired Umami Blend: Add a splash of tamari soy sauce, a drizzle of toasted sesame oil, and a piece of fresh ginger to the simmer. This creates a profile highly reminiscent of a premium Spicy Schezwan Sauce Recipe.
Common Mistakes: Troubleshooting Your Red Chili Sauce
Creating condiments at home is easy, but rushing through the steps can lead to a few common texture and flavor issues. Here is how to fix them like a pro:
1. The Hot Sauce is Way Too Watery
If your sauce separates or feels too thin on your food, you likely added too much water during the simmer or didn’t blend long enough. To fix a thin sauce, pour it back into a clean saucepan and simmer it uncovered over low heat for 5 to 10 minutes to reduce and concentrate the liquid.
2. The Final Blend Feels Too Gritty or Stringy
Depending on the power of your blender, tough chili skins can sometimes leave a slightly grainy texture behind. If you want a perfectly smooth, restaurant-style finish, simply pour the blended sauce through a fine-mesh strainer into a clean bowl, using a rubber spatula to push the smooth liquid through while leaving the heavy pulp behind.
3. The Acidity is Too Harsh or Sharp
Freshly blended hot sauces always taste a bit aggressive right out of the blender container. The absolute best thing you can do is give it time. Pour it into a sterilized bottle and let it mature in your refrigerator for 48 hours. You will be amazed at how the sharp vinegar edge backs down, allowing the savory garlic and rich chili notes to step forward. If you ever swing too far the other way and want pure, dry heat without vinegar, check out my concentrated Carolina Reaper Powder Recipe.
The Ultimate Pairing Guide: How to Serve Your Masterpiece
This homemade red chili sauce recipe belongs on everything. Its balanced acidity and savory umami undertones make it an exceptional match for a massive variety of everyday meals.
There is no better way to wake up than a generous shake of red hot sauce over hot fried eggs, a crispy breakfast burrito, or fresh avocado toast. The sharp acid cuts right through rich egg yolks beautifully.
2. Crispy Wings and Poultry
Use this sauce as a brilliant base glaze for your next party spread. Toss it directly with hot, fresh chicken wings right out of the oven or air fryer. If you want to offer your guests a full line of wing options, place it on the table alongside my definitive guide on Wing Sauce Recipes or my unique, buttery Homemade Cajun Honey Butter Wings Sauce.
3. Tacos, Dips, and Street Food
Drizzle this sauce generously over carne asada tacos, loaded nachos, or vibrant rice bowls. Its clean, punchy profile pairs perfectly with melted cheeses and rich sour cream bases. If you want to mix things up with a creamy dipping companion, serve it alongside a platter of seafood paired with my legendary Best Fish Taco Sauce Recipe, or provide an alternative sweet profile for barbecued items using my Sweet Blackberry BBQ Sauce.
Frequently Asked Questions
How long does this homemade red chili sauce last in the refrigerator?
Stored in a clean, airtight glass bottle or jar, this sauce will easily remain fresh for up to 1 to 2 months in the fridge. The natural acidity of the vinegar combined with the salt acts as an excellent natural preservative.
Can I use dried red chilies instead of fresh ones?
Yes! If you want to use dried chilies (like Ancho, Guajillo, or Arbol), you must rehydrate them first. Stem and seed the dried peppers, then soak them in boiling water for 15 to 20 minutes until soft before proceeding with the recipe.
Is this recipe safe for a gluten-free diet?
Absolutely. This recipe uses entirely whole, unprocessed, plant-based ingredients that are naturally 100% gluten-free, dairy-free, and vegan-friendly.
What is the best way to safely clean a blender after making hot sauce?
To clear out stubborn chili oils, rinse the blender container with warm water. Fill it halfway with warm water, add a few drops of dish soap and a tablespoon of white vinegar, then run the blender on high for 30 seconds before rinsing thoroughly.
Can I substitute the fresh chilies with chili powder?
It is not recommended for this specific style of sauce. Chili powder contains ground dried spices that will create a thick, gritty paste rather than a smooth, bright, pourable hot sauce. Stick to fresh or rehydrated whole chilies for the best results.
====================================================================
               NOVA RECIPES - OFFICIAL RECIPE CARD
====================================================================
Recipe: Classic Scratch-Made Homemade Red Chili Sauce
Prep Time: 10 Minutes | Cook Time: 15 Minutes | Yield: Approx. 2 Cups
====================================================================

INGREDIENTS:
* 10-12 medium fresh red chili peppers (Fresno or Red Jalapeño)
* 1/2 cup sweet yellow onion, roughly diced
* 4 cloves fresh garlic, peeled
* 1/2 cup distilled white vinegar (or apple cider vinegar)
* 1/4 cup filtered water
* 1 tsp brown sugar
* 1 tsp coarse sea salt
* 1 tsp neutral cooking oil

METHOD:

1. PREP THE CHILIES
   Wearing kitchen gloves, remove the green stems from the
   peppers and chop them roughly. For a milder sauce, slice the
   peppers open and scrape out the seeds and white ribs.

2. SWEAT THE AROMATICS
   Heat the neutral oil in a medium saucepan over medium-low
   heat. Add the diced onion and whole garlic cloves. Sauté for
   4 to 5 minutes until soft and fragrant. Do not brown.

3. SIMMER THE SAUCE BASE
   Add the chopped red chilies, brown sugar, sea salt, vinegar,
   and filtered water to the saucepan. Stir well and bring to a
   boil. Immediately lower the heat, cover, and simmer for 15
   minutes until the peppers are completely tender.

4. BLEND UNTIL SILKY
   Remove from the heat and allow to cool slightly. Pour the
   mixture into a high-powered blender. Secure the lid tightly
   and blend on high for 60 to 90 seconds until a velvety,
   completely smooth texture is achieved.

5. REST AND SERVE
   Pour into clean glass bottles or jars. Let cool completely at
   room temperature, seal tightly, and store in the fridge.
   For optimal flavor, let it rest for 48 hours before enjoying.
====================================================================
🌶️ Join the Flavor Lab!
Did you cook up this recipe? I would love to see your beautiful crimson creation! Take a picture of your finished hot sauce bottle or your next meal prep spread and tag @novarecipes on facebook so I can showcase your kitchen mastery to our community!
Homemade Red Chili Sauce Recipe: The Fiery, Flavor-Packed Sauce You’ll Make Every Week
Recipe by StephanieCourse: Homemade Sauces, Dips u0026amp; Marinades
Servings
4
servings
Prep time
30
minutes
Cooking time
40
minutes
Calories
300
kcal
Ingredients
* 10-12 medium fresh red chili peppers (Fresno or Red Jalapeño) * 1/2 cup sweet yellow onion, roughly diced * 4 cloves fresh garlic, peeled * 1/2 cup distilled white vinegar (or apple cider vinegar) * 1/4 cup filtered water * 1 tsp brown sugar * 1 tsp coarse sea salt * 1 tsp neutral cooking oil
Directions
1. PREP THE CHILIES Wearing kitchen gloves, remove the green stems from the peppers and chop them roughly. For a milder sauce, slice the peppers open and scrape out the seeds and white ribs.
2. SWEAT THE AROMATICS Heat the neutral oil in a medium saucepan over medium-low heat. Add the diced onion and whole garlic cloves. Sauté for 4 to 5 minutes until soft and fragrant. Do not brown.
3. SIMMER THE SAUCE BASE Add the chopped red chilies, brown sugar, sea salt, vinegar, and filtered water to the saucepan. Stir well and bring to a boil. Immediately lower the heat, cover, and simmer for 15 minutes until the peppers are completely tender.
4. BLEND UNTIL SILKY Remove from the heat and allow to cool slightly. Pour the mixture into a high-powered blender. Secure the lid tightly and blend on high for 60 to 90 seconds until a velvety, completely smooth texture is achieved.
5. REST AND SERVE Pour into clean glass bottles or jars. Let cool completely at room temperature, seal tightly, and store in the fridge. For optimal flavor, let it rest for 48 hours before enjoying.