Everything You Need to Know About the World’s Most Addictive Snack
Pickled eggs have occupied a glass jar on the back of dive-bar counters for decades. For many, they represent a nostalgic, salty relic of Americana. However, the culinary world has seen a massive shift toward “Swicy” (sweet and spicy) flavor profiles, and the classic pickled egg was due for a makeover.
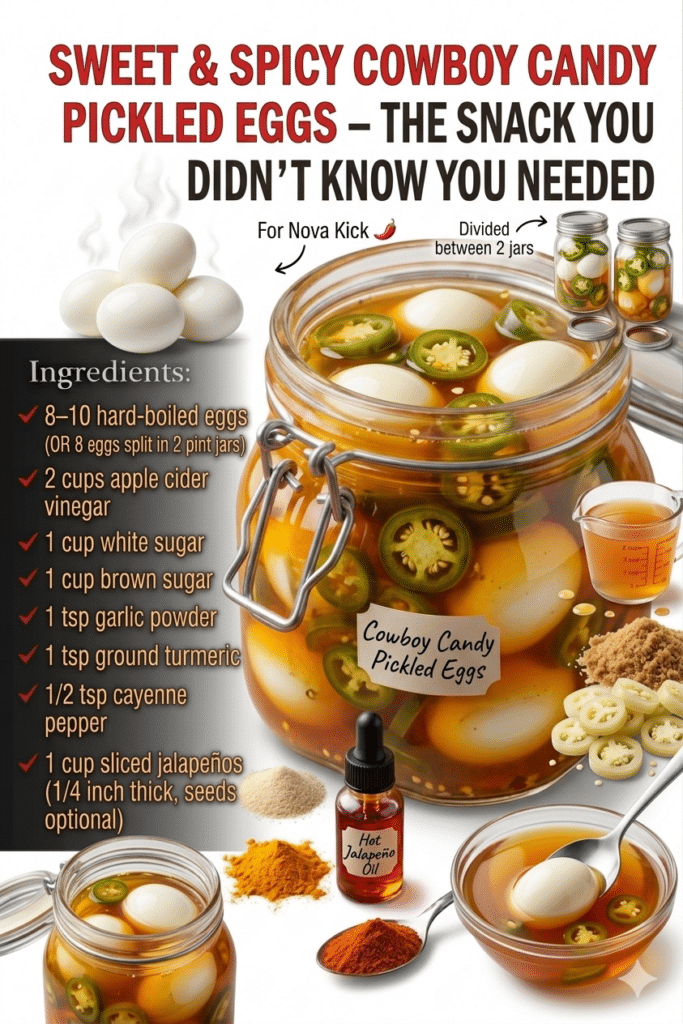
Enter Cowboy Candy Pickled Eggs. By combining the legendary Texas technique of candying jalapeños with the protein-rich foundation of a hard-boiled egg, we create a snack that is sophisticated, vibrant, and incredibly versatile. In this masterclass, we will cover the history, the science, and the step-by-step execution of this viral recipe.
Section 1: What is “Cowboy Candy”?
To master this recipe, you must first understand the “Cowboy Candy” phenomenon. Officially known as Candied Jalapeños, this southern staple involves simmering sliced peppers in a heavy cider vinegar and sugar syrup until they become translucent and jam-like.
The “Cowboy” moniker comes from the rugged, bold flavors—it’s a punch of heat followed immediately by a soothing sweetness. When we apply this brine to eggs, the results are transformative. The acidity of the vinegar tenderizes the egg white, while the sugar creates a silky mouthfeel that contrasts perfectly with the spicy jalapeño kick.
Section 2: The Science of the Ingredients
2.1 The Eggs: Why Fresh Isn’t Always Better
In most culinary applications, “farm fresh” is the gold standard. However, for pickling, eggs that are 7–10 days old are actually superior. As an egg ages, the air cell inside expands and the pH level of the egg white increases. This causes the membrane to adhere less tightly to the shell, making them significantly easier to peel. There is nothing worse than a “cratered” egg ruining the aesthetic of your jar.
2.2 Apple Cider Vinegar (ACV) vs. White Vinegar
Most cheap commercial pickled eggs use 5% acidity white distilled vinegar. While functional, it is one-dimensional and harsh.
ACV brings a mellow, fruity complexity.
It contains malic acid, which pairs naturally with the brown sugar in our recipe to create a profile reminiscent of premium BBQ glazes.
2.3 The Role of Turmeric
Turmeric is often called “Indian Saffron,” but in this recipe, it serves as a powerful natural dye. Without it, pickled eggs can take on a translucent, greyish hue that looks unappealing. The turmeric ensures your eggs turn a bright, “caution-light” yellow that screams flavor and health.
Section 3: Step-by-Step Execution (The Professional Way)
Phase 1: The Perfect Hard-Boil
To avoid the dreaded “green ring” around the yolk (which is caused by a reaction between iron and sulfur during overcooking), follow the 11-Minute Method:
Place eggs in a single layer in a pot.
Cover with one inch of cold water.
Bring to a rolling boil, then immediately turn off the heat and cover.
Let sit for 11 minutes exactly.
The Shock: Transfer eggs to an ice-water bath for 10 minutes. This stops the cooking process and makes peeling a breeze.
Phase 2: Building the “Cowboy” Brine
In a medium saucepan, combine your sugars, vinegar, and spices. Do not skip the boiling step. * Why boil? Sugar has a “saturation point.” If you try to mix two cups of sugar into cold vinegar, it will remain gritty. Heating the liquid allows the sugar molecules to fully dissolve, creating a homogeneous syrup that will penetrate the egg evenly.
Phase 3: Packing the Jars
For maximum presentation, use the “Nesting Technique.” Don’t just dump the jalapeños on top. Place a few eggs, then slide jalapeño slices down the sides of the glass, then add more eggs. This ensures that every bite has a consistent heat level and looks professional on the shelf.
Section 4: Safety and Preservation (Crucial for E-E-A-T)
Google prioritizes safety. It is a common misconception that pickled eggs are shelf-stable at room temperature. They are not.
4.1 The Myth of the Toothpick
Some older recipes suggest “pricking” the egg with a toothpick so the brine gets to the yolk faster. The USDA and food safety experts strongly advise against this. Piercing the egg provides a pathway for bacteria to enter the center of the egg where the acid level is lower. Trust the process—a 5-day soak in the fridge will flavor the yolk perfectly without the risk.
4.2 Storage Timelines
Curing Time: Minimum 3 days; 5–7 days is the “sweet spot.”
Shelf Life: 3 to 4 weeks in the refrigerator.
Warning: If the brine becomes cloudy or the eggs feel “slimy,” discard them immediately.
Section 5: Serving Suggestions and Creative Uses
The Cowboy Deviled Egg: Slice these pickled eggs in half, mash the golden yolks with a little bit of the brine and mayo, and top with one of the candied jalapeños from the jar. It is the best deviled egg you will ever eat.
The “Spicy Cobb” Salad: Traditional Cobb salads use plain hard-boiled eggs. Swap them for Cowboy Candy eggs to add an acidic “pop” that cuts through the richness of the avocado and blue cheese.
The Bloody Mary Garnish: Forget the celery stalk. Skewer a pickled egg, a cube of sharp cheddar, and a candied jalapeño for a brunch garnish that people will talk about for weeks.
Section 6: Troubleshooting Common Issues
“My eggs are rubbery.”
This is usually caused by overcooking the eggs during the initial boil or using a vinegar that has an acidity higher than 5%. Stick to the 11-minute rule.
“The brine is too thick.”
Because of the high sugar content (2 cups total), the brine will be syrupy. This is intentional! It mimics the texture of “Cowboy Candy.” If it’s too thick for your preference, you can add 1/4 cup of water, but this will slightly reduce the shelf life.
“They aren’t spicy enough.”
The heat in jalapeños lives in the pith (the white ribs) and the seeds. For a true “Cowboy” kick, do not de-seed the peppers. If you want even more heat, add 1/2 tsp of red pepper flakes to the boiling brine.
Section 7: Conclusion
Sweet & Spicy Cowboy Candy Pickled Eggs are more than just a snack; they are a conversation piece. By following this guide, you’ve mastered the balance of acidity, sweetness, and heat. This recipe is a testament to how traditional preservation methods can be modernized for the 21st-century palate.
Whether you’re making these for a tailgate, a holiday appetizer, or just a high-protein midnight snack, you now have the tools to create a gourmet product in your own kitchen.