There are few appetizers as universally beloved as the chicken wing. They are the undisputed kings of game days, potlucks, and Friday night comfort food feasts. But among the vast pantheon of wing flavors—from scorching Buffalo to smoky BBQ—one stands out for its perfect balance of sweet, savory, and aromatic punch: Honey Garlic Chicken Wings.
When done right, a honey garlic wing is a masterpiece of textures and flavors. It should have a shatteringly crispy skin that gives way to juicy, tender meat. It should be coated—not drowned—in a glaze that is sticky enough to lick off your fingers, sweet from golden honey, and deeply savory with a pungent kick of fresh garlic and umami-rich soy.
Sad, soggy takeout wings sitting in a pool of lukewarm sauce are a tragedy. This guide is here to ensure you never experience that again. We are going to dive deep into the anatomy of a wing, the science of achieving oven-baked crispiness that rivals a deep fryer, and how to construct a sauce that balances sticky sweetness with savory depth.
Get your napkins ready. We are about to master the art of the sticky wing.
The Anatomy of a Perfect Wing
Before heat ever meets meat, we need to talk about the chicken itself. The quality and preparation of your raw wings sets the stage for the final result.
The Whole Wing vs. “Party Wings”
If you buy “whole wings” at the grocery store, you are getting three distinct parts attached at the joints:
- The Drumette: The meatiest part that looks like a miniature drumstick.
- The Flat (or Wingette): The middle section with two parallel bones and tender meat in between.
- The Tip: The very end piece, which is mostly skin and bone.
For the best eating experience, you want “party wings,” which are already separated into drumettes and flats, with the tips discarded.
Why separate them?
- Even Cooking: Drumettes and flats cook at relatively similar rates. The tips cook much faster and will burn to a crisp before the rest of the meat is safe to eat.
- Surface Area: Separating the joints exposes more skin to the heat, maximizing the potential for crispiness.
- Ease of Eating: It’s simply easier to eat a separated drumette or flat than to navigate a whole jointed wing.
If you buy whole wings, you will need to do some butchery. Use a sharp chef’s knife to locate the joints where the bones meet. You should be able to slice through the cartilage with minimal resistance—if you are forcing the knife through bone, adjust your angle slightly. Save the tips for homemade chicken stock!
The Enemy of Crispiness: Moisture
The single biggest mistake home cooks make with wings is not drying them properly. Moisture is the enemy of crispiness. If the skin is wet when it goes into the oven or fryer, the heat must first evaporate that water before it can begin to render the fat and crisp the skin. This steaming process leads to rubbery wings.
The Fix:
At a minimum, pat your wings thoroughly dry with paper towels. Do this two or three times until the paper towels come away dry.
The Pro Move (The Fridge Dry):
If you have time, arrange your patted-dry wings on a wire rack set over a baking sheet. Place the entire setup uncovered in the refrigerator for 4 to 24 hours. The cold, circulating air in the fridge will dry out the skin significantly. This step alone can make oven-baked wings taste deep-fried.
The Science of the Sauce
A wing without sauce is just chicken; the sauce is where the magic happens. The perfect honey garlic sauce must be a balancing act. It needs to be viscous enough to cling to the wing without dripping off, sweet but not cloying, and packed with savory depth.
The Key Players
- Honey: The star of the show. Use a good quality clover or wildflower honey. Honey provides sweetness, floral notes, and importantly, viscosity. When heated and slightly reduced, the sugars in honey caramelize and thicken, creating that essential sticky texture.
- Fresh Garlic: Do not cut corners here. Garlic powder will not provide the punch you need. You want fresh cloves, minced finely or pressed. We want the sharp, aromatic oils of real garlic to stand up to the sweet honey.
- Soy Sauce: This is the crucial counterpoint to the honey. It adds salt, savory depth, and umami. Without it, the sauce would just taste like candied garlic. Use a regular or reduced-sodium soy sauce, depending on your salt preference.
- Acid (Optional but Recommended): A splash of rice vinegar or a squeeze of fresh lime juice can brighten the sauce and cut through the richness. It adds a “high note” that makes the flavors pop.
- Heat (The Variable): While not traditionally a spicy wing, a little warmth makes the sweet and savory notes sing. A pinch of red pepper flakes or a teaspoon of sriracha in the sauce won’t make them “hot,” but it will add a lovely background warmth.
The Thickening Debate: Reduction vs. Slurry
To get that glossy, restaurant-style glaze that coats a spoon, you need to thicken the sauce. There are two ways to do this:
- Method A: Reduction. Simmer the honey, soy, and garlic mixture until enough water evaporates that the sugars concentrate into a syrup. This intensifies the flavors significantly but requires careful watching to prevent burning.
- Method B: The Cornstarch Slurry. This is the easier, more consistent route. Mix a teaspoon of cornstarch with a tablespoon of cold water, then whisk it into the simmering sauce. It thickens almost instantly without needing to reduce the liquid volume, giving you more sauce without intense sugar concentration. For this guide, we prefer the slurry method for consistency.
The Cooking Method (The Baked “Fake-Out”)
While you can deep-fry or air-fry these wings (and we will touch on those later), the holy grail for most home cooks is an oven-baked method that yields results just as crispy as a fryer, without the mess of a quart of hot oil.
The Secret Weapon: Baking Powder
This is the science hack that changed the homemade wing game forever. Tossing your dried-off chicken wings in a mixture of salt and aluminum-free baking powder before baking is transformative.
How it works: Baking powder is alkaline. It raises the pH level of the chicken skin. This breakdown of the peptide bonds in the skin allows it to get crispy and brown much faster and more efficiently than it would naturally. Furthermore, as the baking powder hits the heat, it creates tiny carbon dioxide bubbles, which expand the skin slightly, creating a micro-bubbly, ultra-crunchy surface.
Note: Make sure you use baking powder, not baking soda. Baking soda will make your wings taste metallic and bitter.
The Setup: Airflow is King
If you bake wings directly on a metal baking sheet, they will sit in their own rendered fat and juices. The tops might get crispy, but the bottoms will be soggy.
To achieve 360-degree crispiness, you must elevate the wings. Place a wire cooling rack inside a foil-lined baking sheet. Spray the rack with non-stick spray. Arrange the wings on the rack, ensuring they are not touching. This allows the super-heated oven air to circulate completely around each wing, rendering the fat and crisping the skin from all sides simultaneously.
The Ultimate Honey Garlic Wings Recipe
This recipe uses the oven-baked method discussed above for maximum crispiness with minimum mess.
- Prep time: 15 minutes (plus drying time)
- Cook time: 45-50 minutes
- Serves: 4 as an appetizer
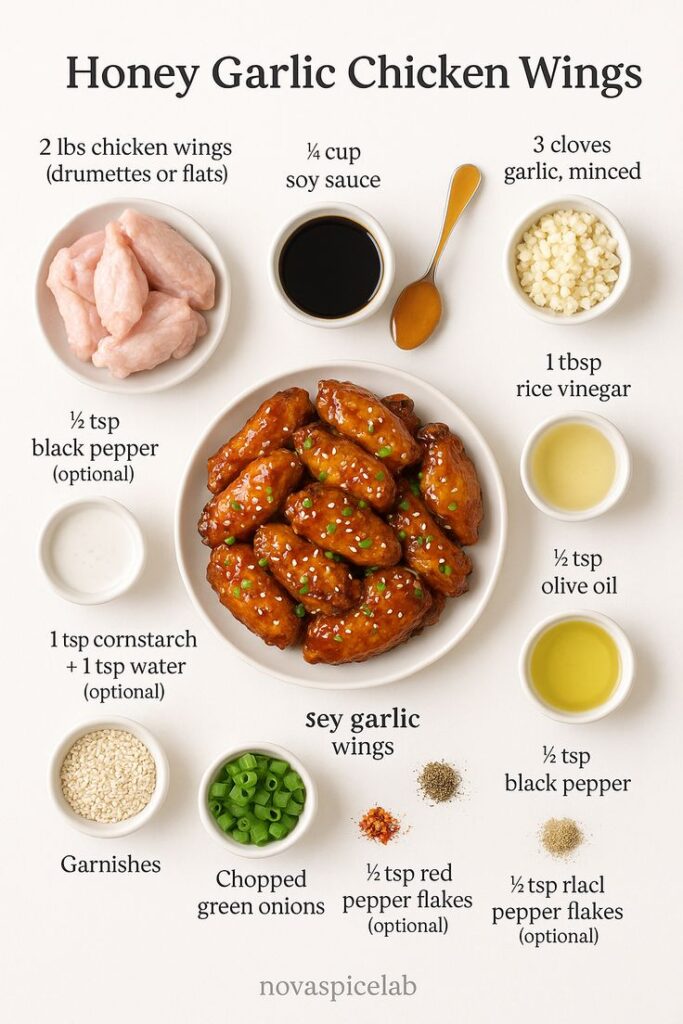
Ingredients

The Wings:
- 4 lbs chicken wings (separated into flats and drumettes, tips removed)
- 2 Tablespoons aluminum-free baking powder (NOT baking soda)
- 1 Tablespoon kosher salt
- 1 teaspoon black pepper
- 1 teaspoon garlic powder (for base flavor on the skin)
- Non-stick cooking spray
The Honey Garlic Glaze:
- 1/2 cup honey
- 1/4 cup soy sauce (use low-sodium if preferred)
- 4 cloves fresh garlic, minced or pressed
- 1 Tablespoon rice vinegar (optional, for brightness)
- 1/2 teaspoon fresh ginger, grated (optional)
- A pinch of red pepper flakes (optional, for warmth)
- Slurry: 1 teaspoon cornstarch mixed with 1 Tablespoon cold water
Garnish:
- Toasted sesame seeds
- Thinly sliced green onions
Instructions
1. Prepare the Wings (Crucial Step!)
Pat the chicken wings thoroughly dry with paper towels. If you have time, place them on a rack in the fridge uncovered for a few hours to dry completely. The drier the skin, the crispier the wing.
2. Preheat and Prep the Pan
Preheat your oven to 425°F (220°C). Line a large, rimmed baking sheet with aluminum foil for easy cleanup. Place a wire cooling rack inside the baking sheet and spray the rack lightly with non-stick cooking spray.
3. The Crisping Coating
In a small bowl, whisk together the baking powder, kosher salt, black pepper, and garlic powder. Place the dried wings in a large bowl and sprinkle the powder mixture over them. Toss vigorously with your hands or a spatula until every wing is evenly coated in a fine, dusty layer.
4. The Bake
Arrange the wings on the prepared wire rack, leaving a little space between each wing so they are not touching. Bake for 20 minutes. Flip the wings over and rotate the pan. Bake for another 20-25 minutes, or until the skin is golden brown and shatteringly crispy.
5. Make the Glaze
While the wings are baking, prepare the sauce. In a small saucepan over medium heat, combine the honey, soy sauce, minced garlic, and any optional ingredients (vinegar, ginger, red pepper flakes). Bring to a gentle simmer.
Give your cornstarch slurry a quick stir and whisk it into the simmering sauce. Let it bubble for about 60 seconds until the sauce has thickened into a glossy glaze that coats the back of a spoon. Remove from heat.
6. The Toss and Serve
Once the wings are done, transfer them immediately to a large clean metal bowl. Pour the hot honey garlic glaze over the wings. Toss repeatedly until every wing is coated in the sticky sauce.
Transfer to a serving platter. Sprinkle immediately with toasted sesame seeds and green onions. Serve hot!
Alternative Cooking Methods
While the oven-baked method is our top recommendation for ease and results, here is how to adapt this recipe for other appliances.
The Air Fryer Method
The air fryer is essentially a powerful convection oven, making it incredible for wings. It’s faster than a conventional oven but requires cooking in batches for larger quantities.
- Prep the wings with the same drying and baking powder coating steps as above.
- Preheat air fryer to 400°F (200°C).
- Arrange wings in a single layer in the basket (do not overcrowd).
- Cook for 10 minutes. Flip wings. Cook for another 8-12 minutes until crispy.
- Toss in sauce as directed.
The Deep-Fry Method (Restaurant Classic)

This is the fastest method and yields the classic “pub” wing texture, but it involves hot oil.
- Dry wings thoroughly. Do not use baking powder for deep frying; just season with salt and pepper. You can dredge them lightly in plain cornstarch or flour for extra crunch if desired.
- Heat at least 3 inches of canola or vegetable oil in a Dutch oven to 375°F (190°C).
- Fry wings in small batches for 8-10 minutes until golden and cooked through (internal temp of 165°F). Maintain oil temperature between batches.
- Drain on a wire rack for a minute, then toss immediately in the sauce.
Troubleshooting and Pro Tips
- My wings aren’t crispy: You didn’t dry them enough, or you overcrowded the pan/air fryer basket. Airflow is essential.
- The sauce burnt in the pan: Honey burns easily. When making the glaze, keep the heat on medium/medium-low and do not walk away from it while it simmers.
- The wings taste bitter: You probably used baking soda instead of baking powder. They are not interchangeable. Check your labels!
- Serving Suggestion: These wings are rich and sticky. Serve them with crisp, refreshing sides to cut the richness, such as celery sticks, cucumber slices, or a sharp, vinegary coleslaw. A side of creamy ranch or blue cheese dip offers a nice contrast, though these wings certainly don’t need it!
Storing and Reheating
Like fried foods, wings are best enjoyed immediately. However, if you have leftovers, they can be saved.
- Storage: Store leftover wings in an airtight container in the refrigerator for up to 3 days.
- Reheating: Do not use the microwave. The microwave will turn the crispy skin into flabby rubber. To reheat, place the wings back on a wire rack over a baking sheet. Bake at 375°F (190°C) for 10-15 minutes until heated through and the skin has re-crisped. You may want to make a small extra batch of sauce to toss them in afterward, as the original sauce will have been absorbed into the skin during reheating.
Conclusion

Mastering the Honey Garlic Chicken Wing is about respecting the process. By taking the time to dry your chicken thoroughly, using the baking powder hack for a shatteringly crisp skin, and creating a balanced, savory-sweet glaze with fresh ingredients, you can create restaurant-quality wings at home any night of the week. So grab a few pounds of wings, fire up the oven, and prepare to become the hero of your next gathering. Enjoy!