If you love rich, flavorful dips, sauces, or spreads, Creamy Garlic Aioli is a game-changer. Silky, garlicky, and versatile, this aioli elevates everything from fries to sandwiches, roasted vegetables, and even grilled meats. Unlike store-bought alternatives, homemade aioli allows you to control freshness, flavor, and texture, creating a condiment that’s truly your own.
What Makes Garlic Aioli Special?
Aioli, a classic Mediterranean sauce, originated from Provence in France and Catalonia in Spain. Traditionally made with garlic and olive oil, modern variations often incorporate mayonnaise or yogurt to simplify preparation while maintaining creamy richness.
Creamy Garlic Aioli stands out because it combines:
Mayonnaise – for a smooth, velvety base
Greek Yogurt – adds tanginess and a protein boost
Garlic – roasted for mellow depth or raw for bold pungency
Lemon Juice – provides a bright, citrusy punch
Olive Oil & Dijon Mustard – help emulsify and add richness
Fresh Parsley – adds freshness and color
The result is a sauce that’s creamy, tangy, and packed with garlic flavor that complements nearly any dish.
Ingredients for Creamy Garlic Aioli
To make this delicious aioli at home, you’ll need simple, fresh ingredients:
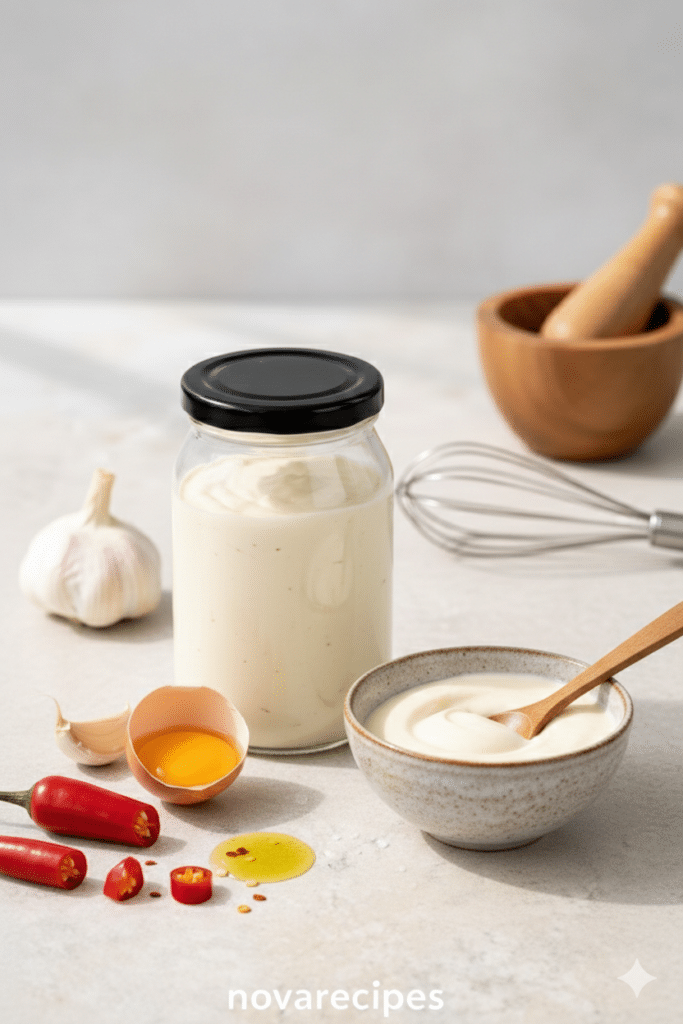
½ cup mayonnaise – the base of your aioli
¼ cup plain Greek yogurt – adds creaminess and tang
1 head of garlic (roasted) or 3–4 raw cloves – adjust based on desired pungency
1 tbsp fresh lemon juice – brightens and balances the flavors
1 tbsp olive oil – contributes richness and silky texture
1 tsp Dijon mustard – emulsifies the sauce and adds subtle zing
1 tbsp fresh parsley, finely chopped – for freshness and visual appeal
Salt and black pepper – to taste
These ingredients are easy to find in most kitchens, making this recipe accessible for everyday cooking.
Step-by-Step Instructions
- Prep the Garlic
Roasted Option: Slice the top off the head of garlic, drizzle with olive oil, wrap in foil, and roast at 400°F (200°C) for 30–35 minutes. Once soft, squeeze the cloves from the skin and mash into a smooth paste.
Raw Option: Peel 3–4 cloves of garlic and crush or finely mince for a bolder, sharper flavor.
Roasting mellows the garlic’s sharpness and creates a naturally sweet, caramelized flavor perfect for a subtle aioli. Raw garlic gives a more intense, pungent taste if you prefer a garlic-forward dip.
- Mix the Base
In a medium bowl:
- Whisk together mayonnaise and Greek yogurt.
- Add the mashed roasted garlic or minced raw garlic.
- Stir in lemon juice, olive oil, and Dijon mustard.
Whisk until the mixture is completely smooth and well combined. The Dijon mustard helps the oil and yogurt emulsify for a perfectly creamy texture.
- Season & Garnish
Fold in the finely chopped fresh parsley.
Taste the aioli and season with salt and freshly ground black pepper to preference.
Parsley not only brightens the flavor but also adds a visually appealing green hue that makes the aioli look as good as it tastes.
- Chill for Maximum Flavor
Cover the bowl and refrigerate the aioli for at least 30 minutes. Chilling allows the flavors to marry, creating a more harmonious and well-rounded taste. This step is optional if you’re in a rush but highly recommended for best results.
Tips for the Perfect Garlic Aioli
Adjust Garlic Strength: Roasting garlic mellows the flavor, while raw garlic delivers a punchy, robust taste. Choose based on your personal preference.
Consistency Control: If you want a thinner aioli for drizzling, add a teaspoon of water or more olive oil until desired consistency is reached.
Fresh Herbs: Beyond parsley, you can experiment with chives, dill, or basil for different flavor profiles.
Storage: Keep the aioli in an airtight container in the fridge for up to 5 days. Stir before use if separation occurs.
Health Benefits of Homemade Aioli
Homemade aioli offers advantages over store-bought versions:
No Preservatives: Free from additives and artificial flavors.
Control Over Fat: You can use light mayonnaise or Greek yogurt for a lower-calorie option.
Nutrient Boost: Olive oil provides healthy monounsaturated fats, and Greek yogurt adds protein.
Garlic Benefits: Garlic is known for its antibacterial properties and cardiovascular benefits.
Enjoy aioli guilt-free in moderation, and you’ll have a flavorful, wholesome addition to your meals.
Variations to Try
- Spicy Garlic Aioli: Add ½ tsp of smoked paprika or a dash of cayenne pepper.
- Lemon-Herb Aioli: Increase lemon juice and mix in thyme or rosemary.
- Roasted Red Pepper Aioli: Blend in roasted red peppers for a sweet, smoky twist.
- Avocado Aioli: Mix in mashed avocado for a creamy, green version perfect for sandwiches.
These variations keep the base creamy texture while introducing exciting new flavors.
How to Use Garlic Aioli
Garlic aioli is versatile and can enhance a wide variety of dishes:
Dipping Sauce: French fries, sweet potato fries, onion rings, and vegetable sticks.
Sandwich Spread: Adds flavor to burgers, wraps, and paninis.
Condiment for Grilled Proteins: Chicken, steak, fish, or shrimp pair beautifully with aioli.
Salad Dressing Alternative: Thin with a little lemon juice or water for a creamy salad dressing.
Gourmet Touch: Use as a drizzle over roasted vegetables, pizza, or even baked potatoes.
Why Make Aioli at Home
Homemade garlic aioli is:
Customizable: Adjust garlic, lemon, and seasoning to your liking.
Fresher: No preservatives or artificial ingredients.
Economical: Cheaper than premium store-bought aioli.
Impressive: Makes any meal look and taste restaurant-quality.
Even a simple plate of fries or roasted vegetables can feel elevated when paired with a dollop of fresh aioli.
Pairing Ideas
Fries & Chips: Classic pairing for crispy snacks.
Grilled Meats: Chicken, lamb, beef, or shrimp.
Vegetables: Roasted asparagus, carrots, or bell peppers.
Sandwiches & Burgers: Adds a gourmet touch to lunch favorites.
Egg Dishes: Perfect for poached eggs or omelets.
The creamy texture and garlicky flavor enhance virtually any dish that benefits from a little richness and tang.
Storage & Shelf Life
Refrigerate: Store in an airtight container for up to 5 days.
Avoid Freezing: Aioli may separate or change texture if frozen.
Stir Before Serving: Natural separation may occur; a quick stir restores creaminess.
FAQs
Q: Can I use regular yogurt instead of Greek yogurt?
A: Yes, but Greek yogurt gives a thicker, creamier texture and more tang.
Q: Can I make aioli without mayonnaise?
A: Absolutely! Traditional aioli uses only garlic and olive oil, but mayonnaise simplifies emulsification for beginners.
Q: How can I make it spicier?
A: Add cayenne, smoked paprika, or a dash of sriracha.
Q: Can I roast garlic ahead of time?
A: Yes, roasted garlic can be prepared a few days in advance and stored in the fridge.
Conclusion
Creamy Garlic Aioli is more than just a dip—it’s a versatile, flavorful addition that can elevate any meal. With a combination of mayonnaise, Greek yogurt, roasted garlic, lemon juice, olive oil, Dijon mustard, and fresh parsley, it’s easy to make yet sophisticated enough to impress.
Whether you’re looking for a snack, a sandwich spread, a sauce for roasted vegetables, or a gourmet touch for grilled meats, this aioli has you covered. Homemade, fresh, and infinitely adaptable, it’s a condiment worth keeping in your kitchen repertoire.
Take the time to make your own aioli today, and experience the depth of flavor that only fresh, homemade ingredients can provide. Once you do, you’ll wonder how you ever lived without it!
I